The Input field tool is a short text area where the user can enter a name, a label, a number, a telephone number etc... As for the Text area element, there is no limit in the number of characters entered.
The options of the Input field element
Once the Input field element has been inserted into your form, access its options by clicking on the button![]() They are divided into the Features, Visibility, Display, Advanced and Help tabs.
They are divided into the Features, Visibility, Display, Advanced and Help tabs.
Let's go further into detail!
Features Tab
The default title is Input field but you can change it if you want
The type: you can choose one of the following:
- Text: a text that can contain letters and numbers, the keyboard available is alphanumeric. It will be possible to use all the keys
- Integer: the proposed keyboard is numeric only. Although the point is accessible, it will not be possible to validate an entry with decimal
- Decimal number: the keyboard is only numeric and it will be possible to validate a number with or without decimal
- Telephone number: the keypad is only numeric and the icon
 appears at the end of the line
 - Email: the proposed keyboard is alphanumeric and the icon
 appears at the end of the line. It will not be possible to validate the entry if the email format is not respected
 - Website address: the proposed keyboard is alphanumeric and the icon
 appears at the end of the line. It will not be possible to validate the entry if the URL format is not respected
 - Serial number: the keyboard is alphanumeric and it is possible to enter letters, numbers, numbers starting with the number 0, special characters or even a long series of characters
The Mandatory input option: by checking this box, when entering the form, you make it mandatory to enter the element. The user will be obliged to fill it in to be able to save his data.
It is possible to enter a default Text which will be displayed automatically during entry, however the user can modify it

Visibility Tab
As with all the fields, you can:
- Set one or more visibility conditions: the field will only be displayed if the condition(s) are verified
- Check Field always hidden: the field will always be hidden when entering the data
- Do nothing: the control will always be visible when typing

Caution: Remember to check the Display invisible fields option on your export files if you have chosen to hide the field systematically or conditionally.
Display Tab
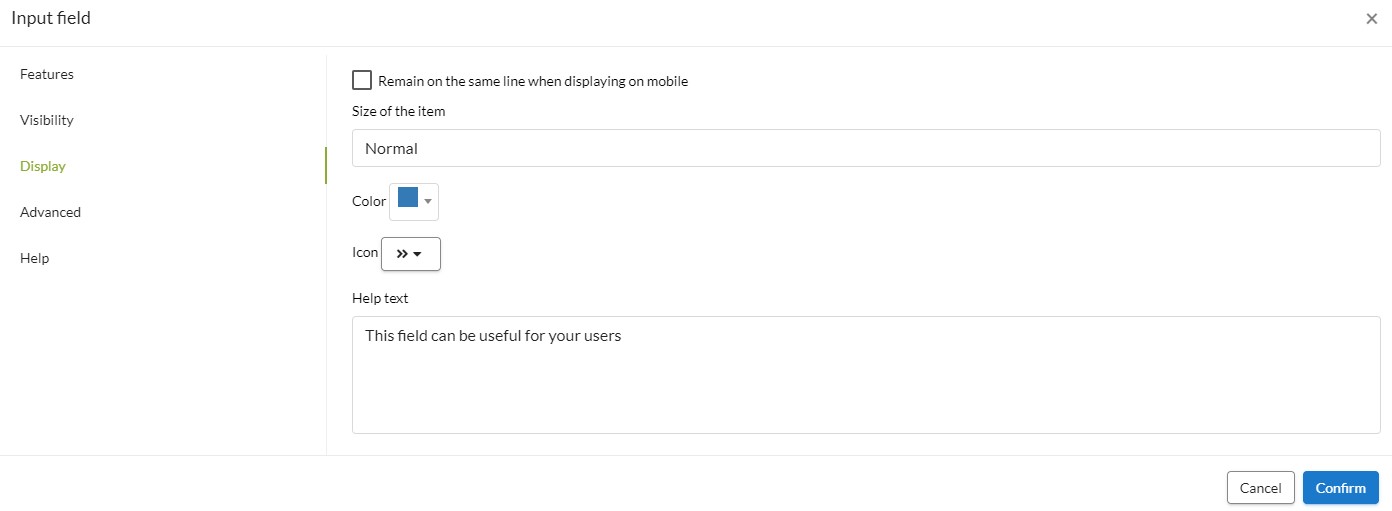
This tab allows you to customize the display of the field on the mobile application, when typing. Here are the options available to you
- Stay on the same line as the previous element when displayed on the mobile: this option is used to display two fields side by side when entering data, provided that you have activated the Allow displaying multiple fields in one line which is found in the mobile app settings
- Element size: this is the font size of the field name when entering the data. You can choose between Normal, Bigger or Smaller
- Color: the field name is displayed in the color of your choice
- Icon: allows the display of an icon next to the name of the field
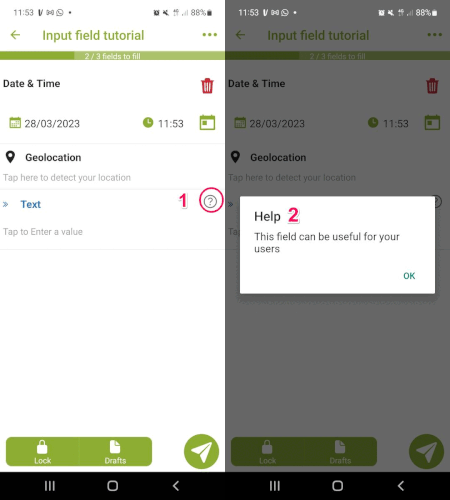
- Help text: it is possible to enter information for your users. It can be consulted, when entering data, by clicking on the button.
 which appears to the right of the field name

The result on Kizeo Forms:

Advanced Tab
1 - List of suggestions: it is possible to associate the edit control with an external list. Unlike with a List type field, during entry you can either select an item in the list, or enter it if it is not in the list
2 - This data is personal data: this option allows you to partially hide personal information, on the data history, and to be able to display all of it with a single click. It also allows you to obtain an Excel CSV export of the various fields tagged as containing personal data
3 - Fill automatically: when this option is activated the icon![]() appears in the field and anything entered is remembered. With each new entry, from the first letters you write, a list of suggested words/phrases is offered. Just click on them to insert them in the field. This is very practical in the case of entries that are repeated from one data to another.
appears in the field and anything entered is remembered. With each new entry, from the first letters you write, a list of suggested words/phrases is offered. Just click on them to insert them in the field. This is very practical in the case of entries that are repeated from one data to another.
4 - Deletion of the paragraph in the personalized Word if empty or invisible data: if you do not insert a photo in this field, the paragraph will not appear in your personalized Word export. Do not hesitate to consult our tutorial When to use: Block tags? paragraph deletion option?
5 - Read only in modification or push: the data cannot be modified after saving or when sending pre-filled data in push
6 - Automatically capitalize: By default, no processing is done, but you can select one of the following to automatically enter certain letters in uppercase. This will apply if you type the text, however if you select an item from a suggestion list, the case will be that of the external list.
- All caps
- No treatment
- Each word
- Beginning of Sentences
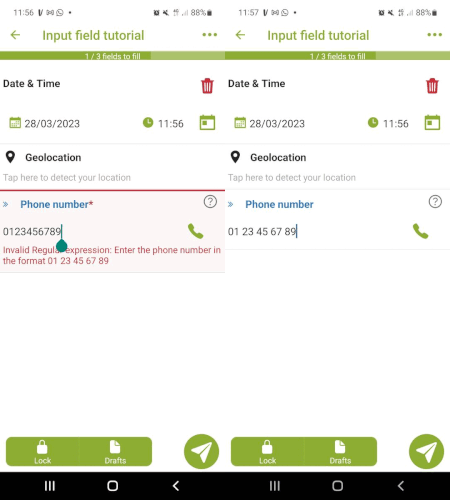
7 - Input mask (Regular expression): it is used to define the expected format in an edit control. The user will be obliged to enter according to this format, otherwise he will not be able to validate his entry. For example, you want your users to enter a phone number, the input mask will be NN NN NN NN NN.
Of course, it will be necessary to adapt the type of entry in the Properties tab in order to have an alphanumeric keyboard. It will then be possible to enter the digits and the space. Similarly, if you specified a list of suggestions, the items in the external list should be in the same format.
8 - Input mask (Explanations for mobiles): this area allows you to enter an indication intended for your users on the expected format. For example, enter the phone number in the format 01 23 45 67 89 and not 0123456789.

Help Tab
This tab displays the field tag. For example, if it is titled Contact Name, its tag will be ##contact_name##

To go further...
-
- First use: Your first steps with Kizeo Forms
- Understanding and using the Calculation field
- Understanding and using the Drawing element
- Understanding and using the Geolocation element
- Understanding and using the Photo element
- Understanding and using the Choice element
- Understanding and using the Barcode element
Do not hesitate to comment on this article !
We are available to answer your questions, suggestions, remarks, etc. !
