When creating a form in Kizeo Forms, you might need to use predefined lists multiple times, whether within the same form or across different forms. By using Kizeo Forms, you can create reusable lists, known as external lists, to save time and effort. This tutorial will guide you on how to create these lists using Excel.
Required Software
You need Microsoft Excel 2007 or later to save your list in .xlsx format. If you do not have Microsoft Office, you can download a trial version or purchase the full package from a partner's site.
Types of External Lists
- Simple List: A basic list, such as a list of towns or cities.
- Hierarchical List: A list with multiple levels (up to 9). For example, you can have regions, each with corresponding departments, and each department with corresponding cities.
- Referential List: This list links several fields (up to 49) to a list item, automatically filling related fields when an item is selected. For example, selecting a person from a list will automatically fill in their address and phone number.
- Referential-Hierarchical List: Combines hierarchical and referential lists. For instance, you can select a person from a multi-level list, and their details will automatically fill in the related fields.
- List with Codes: Allows an export to display a code or reference different from the visible name during input.
- Filtered List: Displays or hides elements of an external list based on user profile information.
Step 1. Creating Lists in Excel
Important Points:
- Your list must be created in an Excel file and saved in .xlsx format.
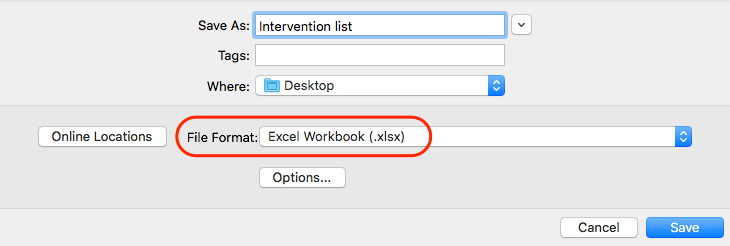
- Kizeo Forms recognizes list types by column names, which must be named exactly as described below and start from cell A1.
The Simple List
- Cell A1: Name it
label. - Start entering your list at cell A2.
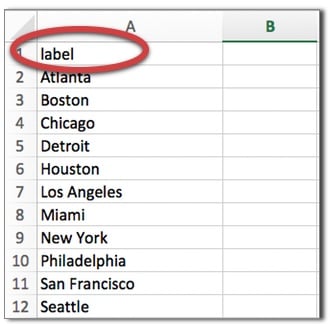
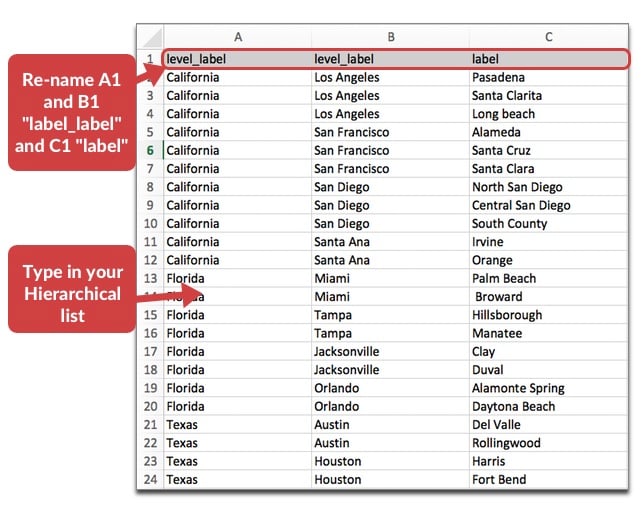
The Hierarchical list
- Cell A1 and B1: Name them
level_label. - The last column must be named
label. - Enter your list accordingly.
Example: For California, select the state first, then choose a city like Los Angeles, and then select a county within Los Angeles.
The Referential List
- Cell A1: Name it
label. - Cells B1, C1, D1, etc.: Name them
ref. - Enter your list.
Example: Selecting "Sarah" fills in fields for first name, address, and member number.

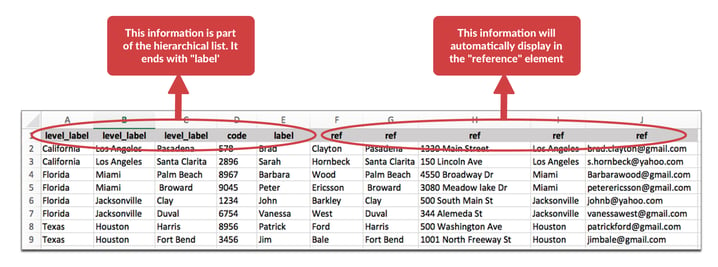
The Hierarchical & Referential List
- Cells A1, B1, C1, etc.: Name them
level_label. - The last column for the hierarchical section and the first for the referential section must be named
label. - Subsequent columns: Name them
ref. - Enter your list.
Example: Selecting a region like "California" narrows down to specific cities and further to specific persons, auto-filling their details.
The List with Codes
- Column before
label: Name itcode. - Enter your list.
Example: Instead of displaying "John", the member code 1234 appears in history and exports.

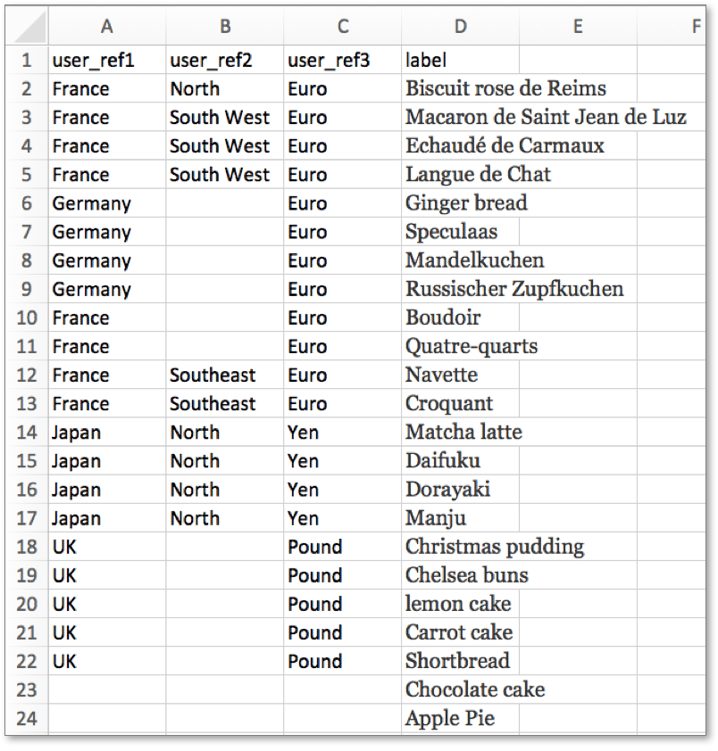
The Filtered List
- Cells A1, B1, C1: Name them
user_ref1,user_ref2,user_ref3for filters. - Cell D1: Name it
label. - Enter your filters and list items.
Example: Users with the filter "Germany" see specific items like "Ginger Breads" on their devices.
Step 2. Importing the lists
- Go to the Kizeo Forms online platform.
- Click on Create an external list.
- Select the Excel option and upload your Excel file.

- Choose Overwrite everything and confirm changes.

- Save your list.

Go a little bit further…
- Create your external list from Excel
- Automatically fill different fields with the referential list.
- The Referential-Hierarchical List
- Give a code to each item of your list!
- Sort your external list according to your users' profile.
- Learn more about the tags you can associate to an item of your list to customize your reports!
