This tutorial is based on the "Push" tutorial. If you do not know what the push is, we recommend you to consult our tutorial: Send pre-filled forms to the field workers.
Generally for a transfer, only fields outside a table can be filled via a push. But it is now possible to pre-filled tables using Excel sheets. For the same push, it is also possible to send only some lines of a table.
The push allows you to send your pre-filled forms from the office to the mobiles of your field workers. In this tutorial, we explain how to pre-filled table of your Push through Excel import.
Pre-filled forms Step 1: Set-up the import model.
Here you will define your import model, in correlation with the Excel file that you will create in the second stage.
- Go to your form general Options, then in the imports (Push) tab.
For the main form (the elements outside the table):
- Select the Main Form from the drop-down menu (this part contains all the items outside the table).
- Fill in the number of lines to ignore on Excel. As a general rule, it is the first line that corresponds to the titles given in each column. The computer will not take this line into account.
- Drag and drop the fields to be pre-completed in the form from left to right.
Note: The first field is ‘ Recipient'. The recipient corresponds to the user identifier (User ID). 
For each pre-filled table:
- Select the table from the drop-down menu. In our example, we select Articles.
- Do not forget to fill in which excel sheet will be the table. Its position must be greater than or equal to 2. The first sheet will be the main form.
- Drag and drop the fields to be pre-completed in the table from left to right.

Step 2: Create the Excel file to import.
A first approach for sending a table would be to make as many imports as recipients; this approach is tedious and limited. But do not worry! Kizeo brings you a solution! You can send multiple 'push' with tables via a single import. There are 2 important notions to remember for the creation of the excel file:
- A table = one sheet. - The non-table fields of the form must be in the first sheet. - Each table will be present in a separate and unique sheet.
- Identifier of the Push: When you want to send data in a table, it is imperative to use an identifier for each line of data. The first column of each excel sheet must be the identifiers. There are two different IDs:
- PUSH_ID: present in the first sheet (main form); it is not unique. You can use the same identifiers several times for different 'push'. When we use the same PUSH_ID for different push, it means that the same table with the same data will be send to different users. It begins with 1.
- PUSH_PARENT_ID: present in the sheets containing tables (in the sheet 2 or more); this identifier allows to link the rows of tables to each push (present in the first sheet). If this value is 3 for example, this line of table will be taken into account for transfers with PUSH_ID: 3.
The goal here is to be able to link the rows to be pre-filled with the push.
The rows of tables to be pre-filled can be the same for all pushes; in this case there is a push-id equal to 1 and a push_parent_id which is also equal to 1.
The rows of tables to be pre-filled can be different according to the push. Depending on the user ,for example, we could want to push a different information. In this case, the push intended for a user and the rows of tables destined for him will have the same identifiers. 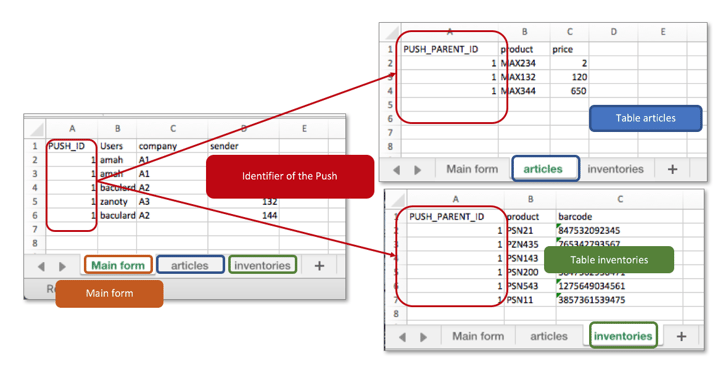
Step 3: Import and data transfer
First case: Import and transfer with identical data of tables
The easiest case would be sending all the contents of a table to users. We want to send 5 push to 3 different users: Amah, Baculard and Zanotti. Our form contains two tables: Articles and Inventories. To create this push, you only need to assign the same identifier to each user concerned (PUSH_ID = 1) and to each row of the table (PUSH_PARENT_ID = 1) as illustrated in the following picture. 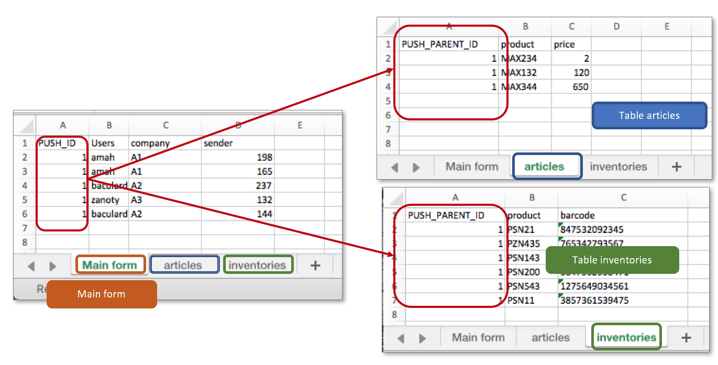 In this case users will receive the same contents for the "articles" and "inventories" tables.
 .jpg?width=225&height=500&name=goods%20reception%20articles%20table%20(1).jpg)
Second Case: Importing and sending tables with different data (pre-filled forms) according to the push.
In this case, you simply need to distinguish between identifiers of the push to filter the rows of the tables.
Example: We want to send 5 push to 3 different users: Amah, Baculard and Zanotti. Our form contains two tables: Articles and Inventories.
- Our first push (A) for Amah will have two tables completed.
- The second (B), also intended for Amah, will only contain data in the second table (Inventories).
- The third (C), intended for Baculard, will have a completed line in the first article. The second table, Inventories, will have two lines.
- The fourth push (D) for Zanotti will have a completed row in the first table and an other row in the second table.
- The last push (E), intended for Baculard will not have a table.
In this example, pushes A, B, C, D and E will only send the rows of the table which PARENT_ID correspond to their PUSH_ID.
For the push B (with identifier 2), the user "amah" will receive an empty table "articles" because no row in this table has a PUSH_PARENT_ID corresponding to the identifier 2. Contrary to the push D, user Zanotti (PUSH_ID = 4) will receive a table "articles" with a completed row (PUSH_PARENT_ID = 4) and another row in the "Inventories" table (PUSH_PARENT_ID = 4). 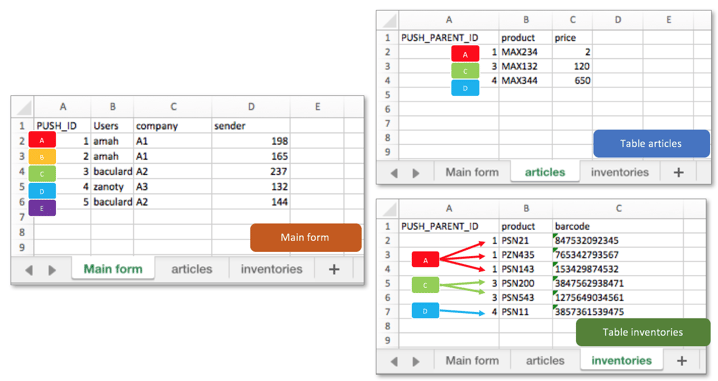
.jpg?width=637&height=869&name=goods%20reception%20per%20user-01-01%20(1).jpg)